

zephex MCP
from cycodehq
Zephex is a hosted MCP gateway built for AI coding editors. It gives your agent 10 ready-to-use tools — check npm packages for vulnerabilities, audit security headers, read and search code, trace request flows, get project context from any repo, and more. One API key, works instantly with Claude Code, Cursor, VS Code, Windsurf, and others. Free to start at zephex.dev.
Cycode CLI User Guide
The Cycode Command Line Interface (CLI) is an application you can install locally to scan your repositories for secrets, infrastructure as code misconfigurations, software composition analysis vulnerabilities, and static application security testing issues.
This guide walks you through both installation and usage.
Table of Contents
- Prerequisites
- Installation
- Cycode CLI Commands
- MCP Command
- Platform Command
- Scan Command
- Report command
- Import command
- Scan logs
- Syntax Help
Prerequisites
- The Cycode CLI application requires Python version 3.9 or later. The MCP command is available only for Python 3.10 and above. If you're using an earlier Python version, this command will not be available.
- Use the
cycode authcommand to authenticate to Cycode with the CLI- Alternatively, you can get a Cycode Client ID and Client Secret Key by following the steps detailed in the Service Account Token and Personal Access Token pages, which contain details on getting these values.
Installation
The following installation steps are applicable to both Windows and UNIX / Linux operating systems.
[!NOTE] The following steps assume the use of
python3andpip3for Python-related commands; however, some systems may instead use thepythonandpipcommands, depending on your Python environment’s configuration.
Starting the MCP Server
To start the MCP server, use the following command:
cycode mcpBy default, this starts the server using the stdio transport, which is suitable for local integrations and AI applications that can spawn subprocesses.
Available Options
| Option | Description |
|---|---|
-t, --transport | Transport type for the MCP server: stdio, sse, or streamable-http (default: stdio) |
-H, --host | Host address to bind the server (used only for non stdio transport) (default: 127.0.0.1) |
-p, --port | Port number to bind the server (used only for non stdio transport) (default: 8000) |
--help | Show help message and available options |
MCP Tools
The MCP server provides the following tools that AI systems can use:
| Tool Name | Description |
|---|---|
cycode_secret_scan | Scan for hardcoded secrets |
cycode_sca_scan | Scan for Software Composition Analysis (SCA) - vulnerabilities and license issues |
cycode_iac_scan | Scan for Infrastructure as Code (IaC) misconfigurations |
cycode_sast_scan | Scan for Static Application Security Testing (SAST) - code quality and security flaws |
cycode_status | Get Cycode CLI version, authentication status, and configuration information |
Each scan tool accepts two mutually exclusive input modes:
paths(preferred) — one or more file or directory paths that exist on disk. Directories are scanned recursively. The Cycode engine handles file discovery and filtering, just ascycode scan -t <type> path ./srcdoes from the CLI.files(fallback) — a dictionary mapping file paths to their full content as strings. Use this only when the files are not available on disk (e.g. in-memory edits not yet saved).
[!TIP] Use
pathswhenever possible. Passing large files (likepackage-lock.json) as inline content can exceed token limits and slow down the AI client. Withpaths, the Cycode engine reads files directly from disk.
All scan tools return a JSON object that includes a "summary" field with a human-readable violation count (e.g. "Cycode found 3 violations: 1 CRITICAL, 2 HIGH.") in addition to the full "detections" array.
Usage Examples
Basic Command Examples
Start the MCP server with default settings (stdio transport):
cycode mcpStart the MCP server with explicit stdio transport:
cycode mcp -t stdioStart the MCP server with Server-Sent Events (SSE) transport:
cycode mcp -t sse -p 8080Start the MCP server with streamable HTTP transport on custom host and port:
cycode mcp -t streamable-http -H 0.0.0.0 -p 9000Learn more about MCP Transport types in the MCP Protocol Specification – Transports.
Configuration Examples
Using MCP with Cursor/VS Code/Claude Desktop/etc (mcp.json)
[!NOTE] For EU Cycode environments, make sure to set the appropriate
CYCODE_API_URLandCYCODE_APP_URLvalues in the environment variables (e.g.,https://api.eu.cycode.comandhttps://app.eu.cycode.com).
Follow this guide to configure the MCP server in your VS Code/GitHub Copilot. Keep in mind that in settings.json, there is an mcp object containing a nested servers sub-object, rather than a standalone mcpServers object.
For stdio transport (direct execution):
{
  "mcpServers": {
    "cycode": {
      "command": "cycode",
      "args": ["mcp"],
      "env": {
        "CYCODE_CLIENT_ID": "your-cycode-id",
        "CYCODE_CLIENT_SECRET": "your-cycode-secret-key",
        "CYCODE_API_URL": "https://api.cycode.com",
        "CYCODE_APP_URL": "https://app.cycode.com"
      }
    }
  }
}
For stdio transport with pipx installation:
{
  "mcpServers": {
    "cycode": {
      "command": "pipx",
      "args": ["run", "cycode", "mcp"],
      "env": {
        "CYCODE_CLIENT_ID": "your-cycode-id",
        "CYCODE_CLIENT_SECRET": "your-cycode-secret-key",
        "CYCODE_API_URL": "https://api.cycode.com",
        "CYCODE_APP_URL": "https://app.cycode.com"
      }
    }
  }
}
For stdio transport with uvx installation:
{
  "mcpServers": {
    "cycode": {
      "command": "uvx",
      "args": ["cycode", "mcp"],
      "env": {
        "CYCODE_CLIENT_ID": "your-cycode-id",
        "CYCODE_CLIENT_SECRET": "your-cycode-secret-key",
        "CYCODE_API_URL": "https://api.cycode.com",
        "CYCODE_APP_URL": "https://app.cycode.com"
      }
    }
  }
}
For SSE transport (Server-Sent Events):
{
  "mcpServers": {
    "cycode": {
      "url": "http://127.0.0.1:8000/sse"
    }
  }
}
For SSE transport on custom port:
{
  "mcpServers": {
    "cycode": {
      "url": "http://127.0.0.1:8080/sse"
    }
  }
}
For streamable HTTP transport:
{
  "mcpServers": {
    "cycode": {
      "url": "http://127.0.0.1:8000/mcp"
    }
  }
}
Running MCP Server in Background
For SSE transport (start server first, then configure client):
# Start the MCP server in the background
cycode mcp -t sse -p 8000 &

# Configure in mcp.json
{
  "mcpServers": {
    "cycode": {
      "url": "http://127.0.0.1:8000/sse"
    }
  }
}
For streamable HTTP transport:
# Start the MCP server in the background
cycode mcp -t streamable-http -H 127.0.0.2 -p 9000 &

# Configure in mcp.json
{
  "mcpServers": {
    "cycode": {
      "url": "http://127.0.0.2:9000/mcp"
    }
  }
}
Advanced Configuration
Custom Certificates and Timeouts (Proxy Environments)
If your organization uses a corporate proxy or a custom CA bundle for HTTPS inspection, you need to tell Cycode CLI (and the underlying Python TLS stack) where to find the trusted certificate bundle. You can also increase the MCP tool call timeout if scans are being cut short.
| Environment Variable | Description |
|---|---|
REQUESTS_CA_BUNDLE | Path to a custom CA bundle file (.pem or .crt). Used by the requests library for all HTTPS calls made by Cycode CLI. |
SSL_CERT_FILE | Path to a custom CA bundle file. Used by Python's low-level ssl module. Set this alongside REQUESTS_CA_BUNDLE for full coverage. |
MCP_TOOL_TIMEOUT | Timeout (in seconds) that MCP clients such as Claude and GitHub Copilot wait for a tool call to complete. Increase this if long-running scans are being cut off before they finish. |
[!TIP] Set both
REQUESTS_CA_BUNDLEandSSL_CERT_FILEto the same CA bundle path.REQUESTS_CA_BUNDLEcovers the HTTP layer;SSL_CERT_FILEcovers the lower-level TLS layer. Using only one may still cause certificate errors in some environments.
Example mcp.json configuration with custom certificates and a longer timeout:
{
  "mcpServers": {
    "cycode": {
      "command": "cycode",
      "args": ["mcp"],
      "env": {
        "REQUESTS_CA_BUNDLE": "/path/to/your/corporate-ca-bundle.pem",
        "SSL_CERT_FILE": "/path/to/your/corporate-ca-bundle.pem",
        "MCP_TOOL_TIMEOUT": "1800"
      }
    }
  }
}
[!NOTE] The MCP server requires proper Cycode CLI authentication to function. Make sure you have authenticated using
cycode author configured your credentials before starting the MCP server.
Pre-authorizing Tools for Subagents (Claude Code)
When Claude Code delegates work to background subagents (e.g. to run scans in parallel), those subagents cannot display interactive permission prompts. If the Cycode tools have not been pre-approved, scans will fail silently in subagent contexts.
To pre-authorize the Cycode MCP tools so they work in all contexts including subagents, add them to the allowedTools list in your Claude Code settings (~/.claude/settings.json):
{
  "allowedTools": [
    "mcp__cycode__cycode_secret_scan",
    "mcp__cycode__cycode_sca_scan",
    "mcp__cycode__cycode_iac_scan",
    "mcp__cycode__cycode_sast_scan",
    "mcp__cycode__cycode_status"
  ]
}
Once added, Claude Code will not prompt for approval when these tools are called, and they will work correctly inside subagents.
Troubleshooting MCP
If you encounter issues with the MCP server, you can enable debug logging to get more detailed information about what's happening. There are two ways to enable debug logging:
- Using the
-vor--verboseflag:
cycode -v mcp- Using the
CYCODE_CLI_VERBOSEenvironment variable:
CYCODE_CLI_VERBOSE=1 cycode mcpThe debug logs will show detailed information about:
- Server startup and configuration
- Connection attempts and status
- Tool execution and results
- Any errors or warnings that occur
This information can be helpful when:
- Diagnosing connection issues
- Understanding why certain tools aren't working
- Identifying authentication problems
- Debugging transport-specific issues
MCP Configuration
Platform Command [BETA]
[!WARNING] The
platformcommand is in beta. Commands, arguments, and output formats are generated dynamically from the Cycode API spec and may change between releases without notice. Do not rely on them in production automation yet.
The cycode platform command exposes the Cycode platform's read APIs as CLI commands. It groups endpoints by resource (e.g. projects, violations, workflows) and turns each endpoint's parameters into typed CLI arguments and --option flags.
cycode platform projects list --page-size 50
cycode platform violations count
cycode platform workflows view <workflow-id>
The OpenAPI spec is fetched from the Cycode API on first use and cached at ~/.cycode/openapi-spec.json for 24 hours. Unrelated commands (cycode scan, cycode status, etc.) do not trigger a fetch.
[!NOTE] You must be authenticated (
cycode authorCYCODE_CLIENT_ID/CYCODE_CLIENT_SECRETenvironment variables) forcycode platformto discover and run commands. Other Cycode CLI commands work without authentication.
Discovering Commands
Because commands are generated from the spec, the source of truth for what's available is --help:
cycode platform --help                  # list all resource groups
cycode platform projects --help         # list actions on a resource
cycode platform projects list --help    # list options/arguments for an action
Platform Examples
# List projects with pagination
cycode platform projects list --page-size 25

# View a single project by ID
cycode platform projects view <project-id>

# Count violations across the tenant
cycode platform violations count

# Filter using query parameters (see `--help` for what each endpoint supports)
cycode platform violations list --severity CRITICAL
All output is JSON by default — pipe it through jq for ad-hoc filtering:
cycode platform projects list --page-size 100 | jq '.items[].name'Exclude Paths From Scans
You can use a .cycodeignore file to tell the Cycode CLI which files and directories to exclude from scans.
It works just like a .gitignore file. This helps you focus scans on your relevant code and prevent certain paths from triggering violations locally.
How It Works
- Create a file named
.cycodeignorein your workfolder. - List the files and directories you want to exclude, using the same patterns as
.gitignore. - Place this file in the directory where you plan to run the cycode scan command.
[!WARNING]
- Invalid files: If the
.cycodeignorefile contains a syntax error, the CLI scan will fail and return an error.- Ignoring paths vs. violations: This file is for excluding paths. It's different from the CLI's capability to ignore specific violations (for example, by using the --ignore-violation flag).
Supported Scanners
- SAST
- IaC (comming soon)
- SCA (comming soon)
Scan Results
Each scan will complete with a message stating if any issues were found or not.
If no issues are found, the scan ends with the following success message:
Good job! No issues were found!!! 👏👏👏
If an issue is found, a violation card appears upon completion instead. In this case you should review the file in question for the specific line highlighted by the result message. Implement any changes required to resolve the issue, then execute the scan again.
Show/Hide Secrets
In the examples below, a secret was found in the file secret_test, located in the subfolder cli. The second part of the message shows the specific line the secret appears in, which in this case is a value assigned to googleApiKey.
Note how the example obscures the actual secret value, replacing most of the secret with asterisks. Scans obscure secrets by default, but you may optionally disable this feature to view the full secret (assuming the machine you are viewing the scan result on is sufficiently secure from prying eyes).
To disable secret obfuscation, add the --show-secret argument to any type of scan.
In the following example, a Path Scan is executed against the cli subdirectory with the option enabled to display any secrets found in full:
cycode scan --show-secret path ./cli
The result would then not be obfuscated.
Soft Fail
In normal operation the CLI will return an exit code of 1 when issues are found in the scan results. Depending on your CI/CD setup this will usually result in an overall failure. If you don't want this to happen, you can use the soft fail feature.
By adding the --soft-fail option to any type of scan, the exit code will be forced to 0 regardless of whether any results are found.
Example Scan Results
Secrets Result Example
╭─────────────────────────────────────────────────────────────── Hardcoded generic-password is used ───────────────────────────────────────────────────────────────╮
│                                                                                                                                               Violation 12 of 12 │
│ ╭─ 🔍 Details ───────────────────────────────────────╮ ╭─ 💻 Code Snippet ─────────────────────────────────────────────────────────────────────────────────────╮ │
│ │  Severity    🟠 MEDIUM                             │ │   34 };                                                                                               │ │
│ │  In file     /Users/cycodemacuser/NodeGoat/test/s  │ │   35                                                                                                  │ │
│ │              ecurity/profile-test.js               │ │   36 var sutUserName = "user1";                                                                       │ │
│ │  Secret SHA  b4ea3116d868b7c982ee6812cce61727856b  │ │ ❱ 37 var sutUserPassword = "Us*****23";                                                               │ │
│ │              802b3063cd5aebe7d796988552e0          │ │   38                                                                                                  │ │
│ │  Rule ID     68b6a876-4890-4e62-9531-0e687223579f  │ │   39 chrome.setDefaultService(service);                                                               │ │
│ ╰────────────────────────────────────────────────────╯ │   40                                                                                                  │ │
│                                                        ╰───────────────────────────────────────────────────────────────────────────────────────────────────────╯ │
│ ╭─ 📝 Summary ─────────────────────────────────────────────────────────────────────────────────────────────────────────────────────────────────────────────────╮ │
│ │ A generic secret or password is an authentication token used to access a computer or application and is assigned to a password variable.                     │ │
│ ╰──────────────────────────────────────────────────────────────────────────────────────────────────────────────────────────────────────────────────────────────╯ │
╰──────────────────────────────────────────────────────────────────────────────────────────────────────────────────────────────────────────────────────────────────╯
IaC Result Example
╭──────────── Enable Content Encoding through the attribute 'MinimumCompressionSize'. This value should be greater than -1 and smaller than 10485760. ─────────────╮
│                                                                                                                                              Violation 45 of 110 │
│ ╭─ 🔍 Details ───────────────────────────────────────╮ ╭─ 💻 Code Snippet ─────────────────────────────────────────────────────────────────────────────────────╮ │
│ │  Severity      🟠 MEDIUM                           │ │   20 BinaryMediaTypes:                                                                                │ │
│ │  In file       ...ads-copy/iac/cft/api-gateway/ap  │ │   21   - !Ref binaryMediaType1                                                                        │ │
│ │                i-gateway-rest-api/deploy.yml       │ │   22   - !Ref binaryMediaType2                                                                        │ │
│ │  IaC Provider  CloudFormation                      │ │ ❱ 23 MinimumCompressionSize: -1                                                                       │ │
│ │  Rule ID       33c4b90c-3270-4337-a075-d3109c141b  │ │   24 EndpointConfiguration:                                                                           │ │
│ │                53                                  │ │   25   Types:                                                                                         │ │
│ ╰────────────────────────────────────────────────────╯ │   26     - EDGE                                                                                       │ │
│                                                        ╰───────────────────────────────────────────────────────────────────────────────────────────────────────╯ │
│ ╭─ 📝 Summary ─────────────────────────────────────────────────────────────────────────────────────────────────────────────────────────────────────────────────╮ │
│ │ This policy validates the proper configuration of content encoding in AWS API Gateway. Specifically, the policy checks for the attribute                     │ │
│ │ 'minimum_compression_size' in API Gateway REST APIs. Correct configuration of this attribute is important for enabling content encoding of API responses for │ │
│ │ improved API performance and reduced payload sizes.                                                                                                          │ │
│ ╰──────────────────────────────────────────────────────────────────────────────────────────────────────────────────────────────────────────────────────────────╯ │
╰──────────────────────────────────────────────────────────────────────────────────────────────────────────────────────────────────────────────────────────────────╯
SCA Result Example
╭─────────────────────────────────────────────────────── [CVE-2019-10795] Prototype Pollution in undefsafe ────────────────────────────────────────────────────────╮
│                                                                                                                                             Violation 172 of 195 │
│ ╭─ 🔍 Details ───────────────────────────────────────╮ ╭─ 💻 Code Snippet ─────────────────────────────────────────────────────────────────────────────────────╮ │
│ │  Severity               🟠 MEDIUM                  │ │   26758   "integrity": "sha1-5z3T17DXxe2G+6xrCufYxqadUPo=",                                           │ │
│ │  In file                /Users/cycodemacuser/Node  │ │   26759   "dev": true                                                                                 │ │
│ │                         Goat/package-lock.json     │ │   26760 },                                                                                            │ │
│ │  CVEs                   CVE-2019-10795             │ │ ❱ 26761 "undefsafe": {                                                                                │ │
│ │  Package                undefsafe                  │ │   26762   "version": "2.0.2",                                                                         │ │
│ │  Version                2.0.2                      │ │   26763   "resolved": "https://registry.npmjs.org/undefsafe/-/undefsafe-2.0.2.tgz",                   │ │
│ │  First patched version  Not fixed                  │ │   26764   "integrity": "sha1-Il9rngM3Zj4Njnz9aG/Cg2zKznY=",                                           │ │
│ │  Dependency path        nodemon 1.19.1 ->          │ ╰───────────────────────────────────────────────────────────────────────────────────────────────────────╯ │
│ │                         undefsafe 2.0.2            │                                                                                                           │
│ │  Rule ID                9c6a8911-e071-4616-86db-4  │                                                                                                           │
│ │                         943f2e1df81                │                                                                                                           │
│ ╰────────────────────────────────────────────────────╯                                                                                                           │
│ ╭─ 📝 Summary ─────────────────────────────────────────────────────────────────────────────────────────────────────────────────────────────────────────────────╮ │
│ │ undefsafe before 2.0.3 is vulnerable to Prototype Pollution. The 'a' function could be tricked into adding or modifying properties of Object.prototype using │ │
│ │ a __proto__ payload.                                                                                                                                         │ │
│ ╰────────────────────────────────────────────────────────────────────────────────────────────────────────────────
Install Cycode CLI
To install the Cycode CLI application on your local machine, perform the following steps:
-
Open your command line or terminal application.
-
Execute one of the following commands:
-
To install from PyPI:
pip3 install cycode -
To install from Homebrew:
brew install cycode -
To install from GitHub Releases navigate and download executable for your operating system and architecture, then run the following command:
cd /path/to/downloaded/cycode-cli chmod +x cycode ./cycode -
-
Finally authenticate the CLI. There are three methods to set the Cycode client ID and credentials (client secret or OIDC ID token):
- cycode auth (Recommended)
- cycode configure
- Add them to your environment variables
Using the Auth Command
[!NOTE] This is the recommended method for setting up your local machine to authenticate with Cycode CLI.
-
Type the following command into your terminal/command line window:
cycode auth -
A browser window will appear, asking you to log into Cycode (as seen below):
<img alt="Cycode login" height="300" src="https://raw.githubusercontent.com/cycodehq/cycode-cli/main/images/cycode_login.png"/> -
Enter your login credentials on this page and log in.
-
You will eventually be taken to the page below, where you'll be asked to choose the business group you want to authorize Cycode with (if applicable):
<img alt="authorize CLI" height="450" src="https://raw.githubusercontent.com/cycodehq/cycode-cli/main/images/authorize_cli.png"/>[!NOTE] This will be the default method for authenticating with the Cycode CLI.
-
Click the Allow button to authorize the Cycode CLI on the selected business group.
<img alt="allow CLI" height="450" src="https://raw.githubusercontent.com/cycodehq/cycode-cli/main/images/allow_cli.png"/> -
Once completed, you'll see the following screen if it was selected successfully:
<img alt="successfully auth" height="450" src="https://raw.githubusercontent.com/cycodehq/cycode-cli/main/images/successfully_auth.png"/> -
In the terminal/command line screen, you will see the following when exiting the browser window:
Successfully logged into cycode
Using the Configure Command
[!NOTE] If you already set up your Cycode Client ID and Client Secret through the Linux or Windows environment variables, those credentials will take precedent over this method.
-
Type the following command into your terminal/command line window:
cycode configure -
Enter your Cycode API URL value (you can leave blank to use default value).
Cycode API URL [https://api.cycode.com]: https://api.onpremise.com -
Enter your Cycode APP URL value (you can leave blank to use default value).
Cycode APP URL [https://app.cycode.com]: https://app.onpremise.com -
Enter your Cycode Client ID value.
Cycode Client ID []: 7fe5346b-xxxx-xxxx-xxxx-55157625c72d -
Enter your Cycode Client Secret value (skip if you plan to use an OIDC ID token).
Cycode Client Secret []: c1e24929-xxxx-xxxx-xxxx-8b08c1839a2e -
Enter your Cycode OIDC ID Token value (optional).
Cycode ID Token []: eyJhbGciOiJSUzI1NiIsInR5cCI6IkpXVCJ9... -
If the values were entered successfully, you'll see the following message:
Successfully configured CLI credentials!or/and
Successfully configured Cycode URLs!
If you go into the .cycode folder under your user folder, you'll find these credentials were created and placed in the credentials.yaml file in that folder.
The URLs were placed in the config.yaml file in that folder.
Add to Environment Variables
On Unix/Linux:
export CYCODE_CLIENT_ID={your Cycode ID}and
export CYCODE_CLIENT_SECRET={your Cycode Secret Key}If your organization uses OIDC authentication, you can provide the ID token instead (or in addition):
export CYCODE_ID_TOKEN={your Cycode OIDC ID token}On Windows
-
From the Control Panel, navigate to the System menu:
<img height="30" src="https://raw.githubusercontent.com/cycodehq/cycode-cli/main/images/image1.png" alt="system menu"/> -
Next, click Advanced system settings:
<img height="30" src="https://raw.githubusercontent.com/cycodehq/cycode-cli/main/images/image2.png" alt="advanced system setting"/> -
In the System Properties window that opens, click the Environment Variables button:
<img height="30" src="https://raw.githubusercontent.com/cycodehq/cycode-cli/main/images/image3.png" alt="environments variables button"/> -
Create
<img height="100" src="https://raw.githubusercontent.com/cycodehq/cycode-cli/main/images/image4.png" alt="environment variables window"/>CYCODE_CLIENT_IDandCYCODE_CLIENT_SECRETvariables with values matching your ID and Secret Key, respectively. If you authenticate via OIDC, addCYCODE_ID_TOKENwith your OIDC ID token value as well: -
Insert the
cycode.exeinto the path to complete the installation.
Install Pre-Commit Hook
Cycode's pre-commit and pre-push hooks can be set up within your local repository so that the Cycode CLI application will identify any issues with your code automatically before you commit or push it to your codebase.
[!NOTE] pre-commit and pre-push hooks are not available for IaC scans.
Perform the following steps to install the pre-commit hook:
Installing Pre-Commit Hook
-
Install the pre-commit framework (Python 3.9 or higher must be installed):
pip3 install pre-commit -
Navigate to the top directory of the local Git repository you wish to configure.
-
Create a new YAML file named
.pre-commit-config.yaml(include the beginning.) in the repository’s top directory that contains the following:repos: - repo: https://github.com/cycodehq/cycode-cli rev: v3.5.0 hooks: - id: cycode stages: [pre-commit] -
Modify the created file for your specific needs. Use hook ID
cycodeto enable scan for Secrets. Use hook IDcycode-scato enable SCA scan. Use hook IDcycode-sastto enable SAST scan. If you want to enable all scanning types, use this configuration:repos: - repo: https://github.com/cycodehq/cycode-cli rev: v3.5.0 hooks: - id: cycode stages: [pre-commit] - id: cycode-sca stages: [pre-commit] - id: cycode-sast stages: [pre-commit] -
Install Cycode’s hook:
pre-commit installA successful hook installation will result in the message:
Pre-commit installed at .git/hooks/pre-commit. -
Keep the pre-commit hook up to date:
pre-commit autoupdateIt will automatically bump
revin.pre-commit-config.yamlto the latest available version of Cycode CLI.
[!NOTE] Trigger happens on
git commitcommand. Hook triggers only on the files that are staged for commit.
Installing Pre-Push Hook
To install the pre-push hook in addition to or instead of the pre-commit hook:
-
Add the pre-push hooks to your
.pre-commit-config.yamlfile:repos: - repo: https://github.com/cycodehq/cycode-cli rev: v3.5.0 hooks: - id: cycode-pre-push stages: [pre-push] -
Install the pre-push hook:
pre-commit install --hook-type pre-push -
For both pre-commit and pre-push hooks, use:
pre-commit install
pre-commit install --hook-type pre-push
[!NOTE] Pre-push hooks trigger on
git pushcommand and scan only the commits about to be pushed.
Cycode CLI Commands
The following are the options and commands available with the Cycode CLI application:
| Option | Description |
|---|---|
-v, --verbose | Show detailed logs. |
--no-progress-meter | Do not show the progress meter. |
--no-update-notifier | Do not check CLI for updates. |
-o, --output [rich|text|json|table] | Specify the output type. The default is rich. |
--client-id TEXT | Specify a Cycode client ID for this specific scan execution. |
--client-secret TEXT | Specify a Cycode client secret for this specific scan execution. |
--id-token TEXT | Specify a Cycode OIDC ID token for this specific scan execution. |
--install-completion | Install completion for the current shell.. |
--show-completion [bash|zsh|fish|powershell|pwsh] | Show completion for the specified shell, to copy it or customize the installation. |
-h, --help | Show options for given command. |
| Command | Description |
|---|---|
| auth | Authenticate your machine to associate the CLI with your Cycode account. |
| configure | Initial command to configure your CLI client authentication. |
| ignore | Ignore a specific value, path or rule ID. |
| mcp | Start the Model Context Protocol (MCP) server to enable AI integration with Cycode scanning capabilities. |
| scan | Scan the content for Secrets/IaC/SCA/SAST violations. You`ll need to specify which scan type to perform: commit-history/path/repository/etc. |
| report | Generate report. You will need to specify which report type to perform as SBOM. |
| status | Show the CLI status and exit. |
MCP Command [EXPERIMENT]
[!WARNING] The MCP command is available only for Python 3.10 and above. If you're using an earlier Python version, this command will not be available.
The Model Context Protocol (MCP) command allows you to start an MCP server that exposes Cycode's scanning capabilities to AI systems and applications. This enables AI models to interact with Cycode CLI tools via a standardized protocol.
[!TIP] For the best experience, install Cycode CLI globally on your system using
pip install cycodeorbrew install cycode, then authenticate once withcycode auth. After global installation and authentication, you won't need to configureCYCODE_CLIENT_IDandCYCODE_CLIENT_SECRETenvironment variables in your MCP configuration files.

Running a Scan
The Cycode CLI application offers several types of scans so that you can choose the option that best fits your case. The following are the current options and commands available:
| Option | Description |
|---|---|
-t, --scan-type [secret|iac|sca|sast] | Specify the scan you wish to execute (secret/iac/sca/sast), the default is secret. |
--show-secret BOOLEAN | Show secrets in plain text. See Show/Hide Secrets section for more details. |
--soft-fail BOOLEAN | Run scan without failing, always return a non-error status code. See Soft Fail section for more details. |
--severity-threshold [INFO|LOW|MEDIUM|HIGH|CRITICAL] | Show only violations at the specified level or higher. |
--sca-scan | Specify the SCA scan you wish to execute (package-vulnerabilities/license-compliance). The default is both. |
--monitor | When specified, the scan results will be recorded in Cycode. |
--cycode-report | Display a link to the scan report in the Cycode platform in the console output. |
--no-restore | When specified, Cycode will not run the restore command. This will scan direct dependencies ONLY! |
--stop-on-error | Abort the scan if any file collection or dependency restore failure occurs, instead of skipping the failed file and continuing. |
--gradle-all-sub-projects | Run gradle restore command for all sub projects. This should be run from |
--maven-settings-file | For Maven only, allows using a custom settings.xml file when scanning for dependencies |
--help | Show options for given command. |
| Command | Description |
|---|---|
| commit-history | Scan commit history or perform diff scanning between specific commits |
| path | Scan the files in the path supplied in the command |
| pre-commit | Use this command to scan the content that was not committed yet |
| repository | Scan git repository including its history |
Options
Severity Option
To limit the results of the scan to a specific severity threshold, the argument --severity-threshold can be added to the scan command.
For example, the following command will scan the repository for policy violations that have severity of Medium or higher:
cycode scan --severity-threshold MEDIUM repository ~/home/git/codebase
Monitor Option
[!NOTE] This option is only available to SCA scans.
To push scan results tied to the SCA policies found in an SCA type scan to Cycode, add the argument --monitor to the scan command.
For example, the following command will scan the repository for SCA policy violations and push them to Cycode platform:
cycode scan -t sca --monitor repository ~/home/git/codebase
Cycode Report Option
For every scan performed using the Cycode CLI, a report is automatically generated and its results are sent to Cycode. These results are tied to the relevant policies (e.g., SCA policies for Repository scans) within the Cycode platform.
To have the direct URL to this Cycode report printed in your CLI output after the scan completes, add the argument --cycode-report to your scan command.
cycode scan --cycode-report repository ~/home/git/codebase
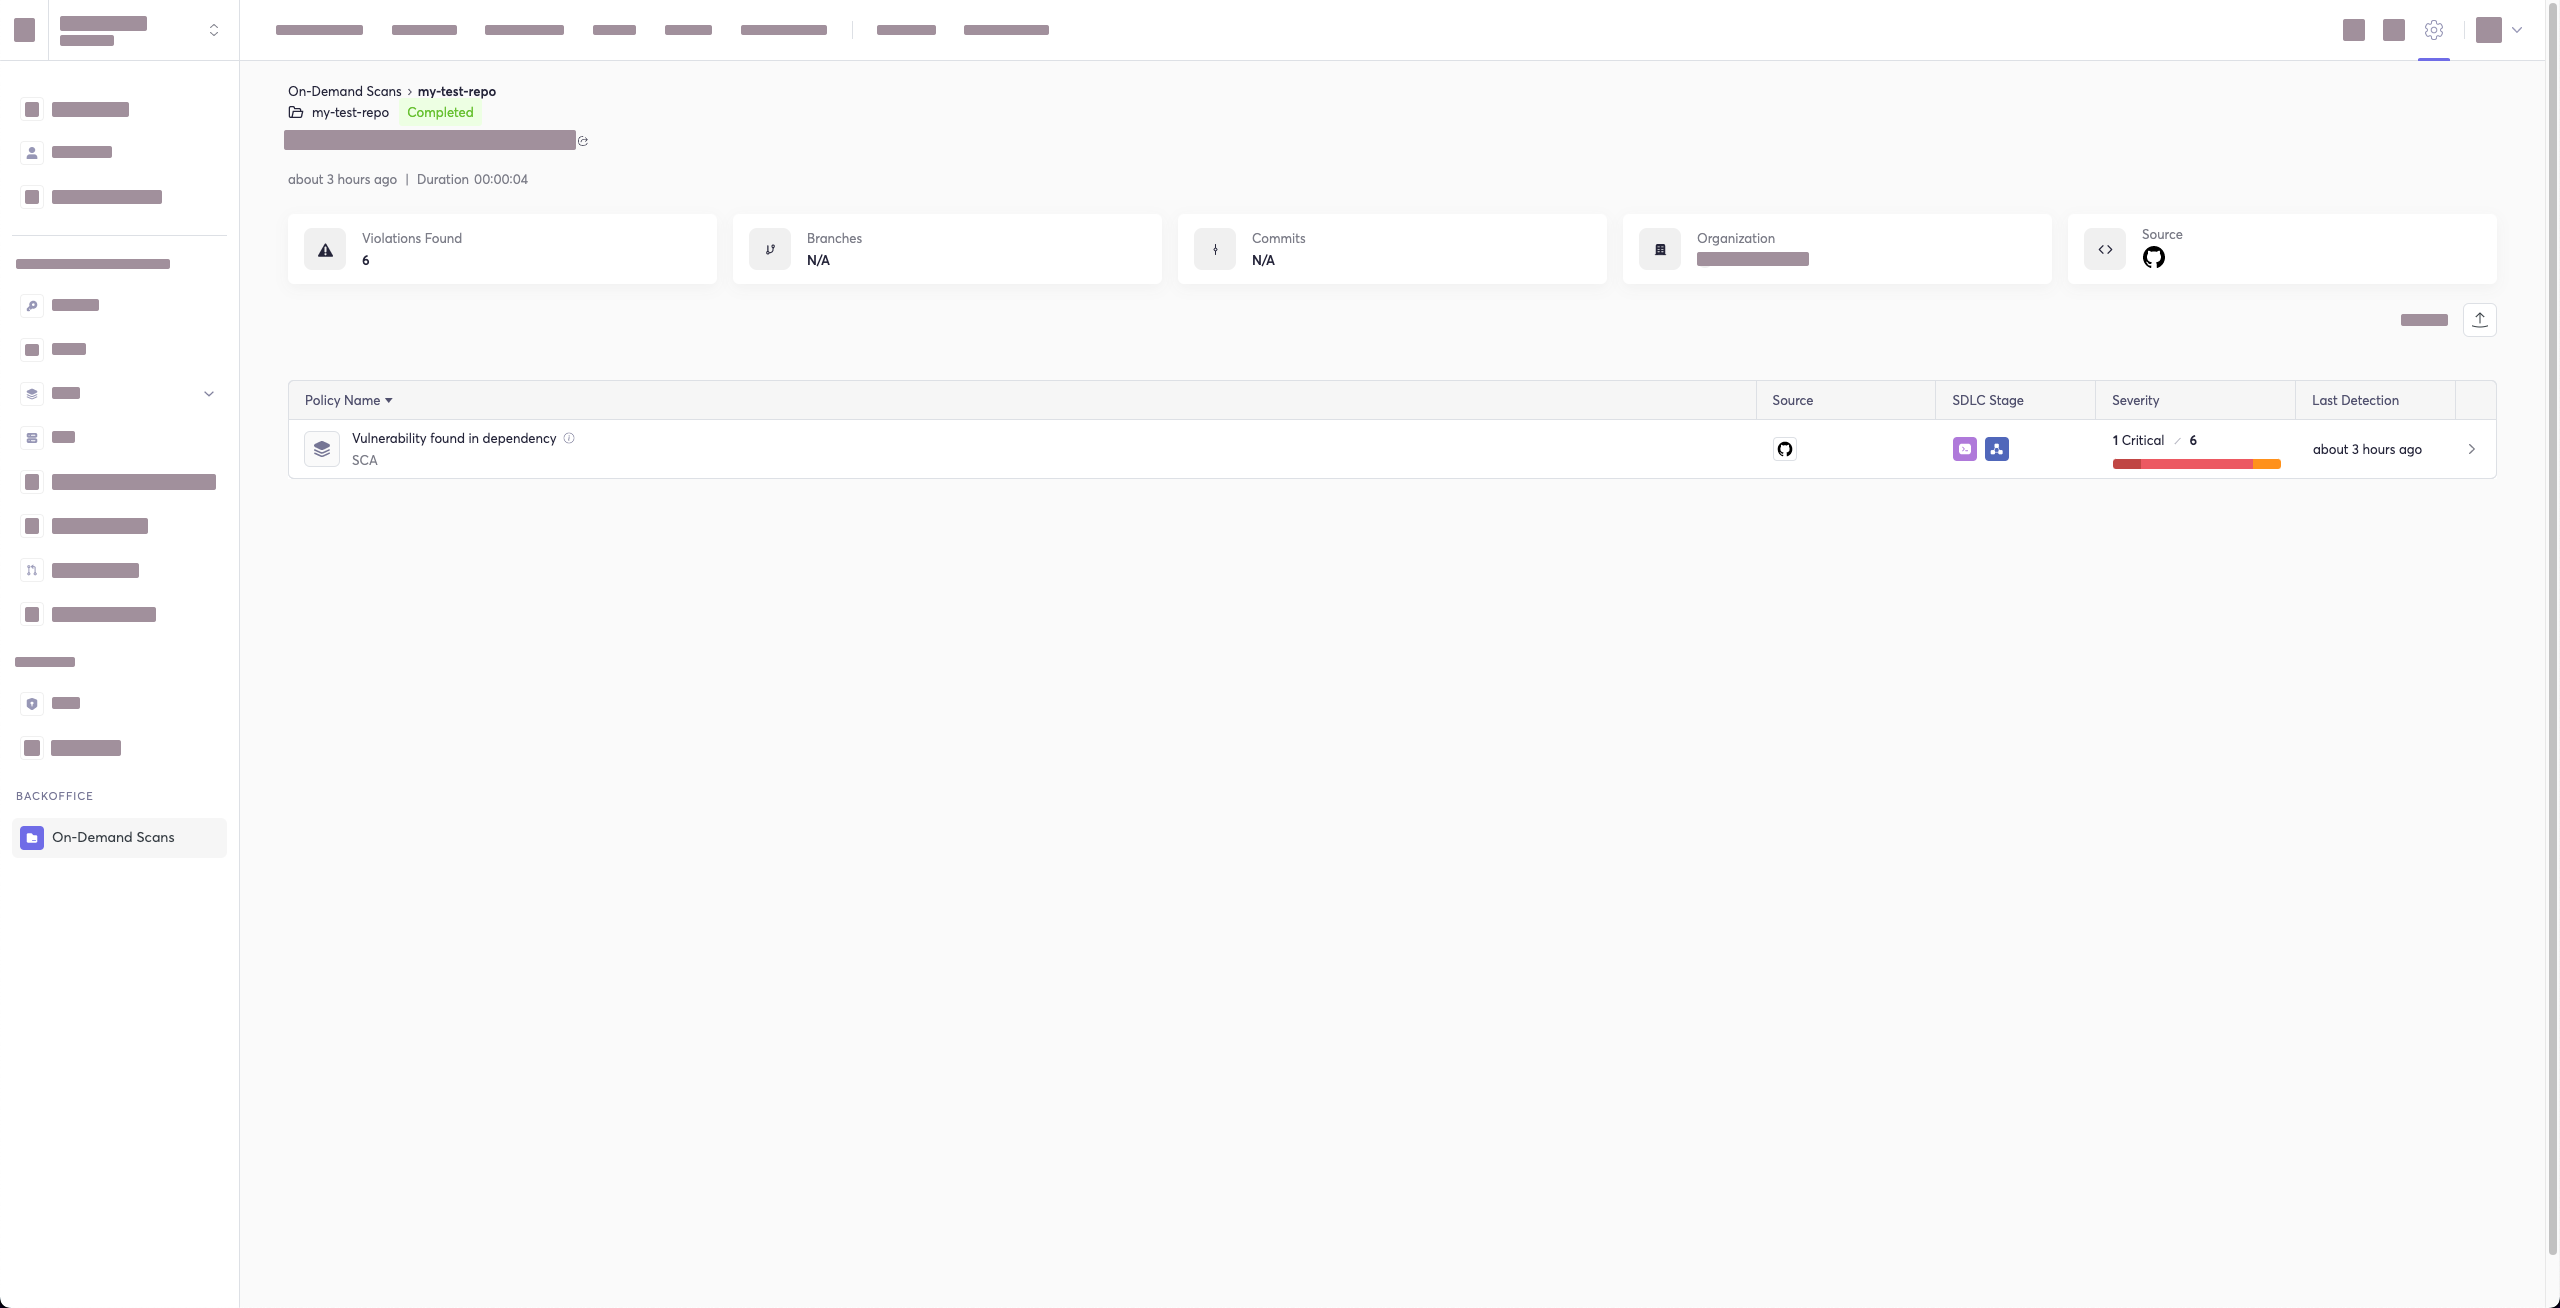
All scan results from the CLI will appear in the CLI Logs section of Cycode. If you included the --cycode-report flag in your command, a direct link to the specific report will be displayed in your terminal following the scan results.
[!WARNING] You must have the
owneroradminrole in Cycode to view this page.
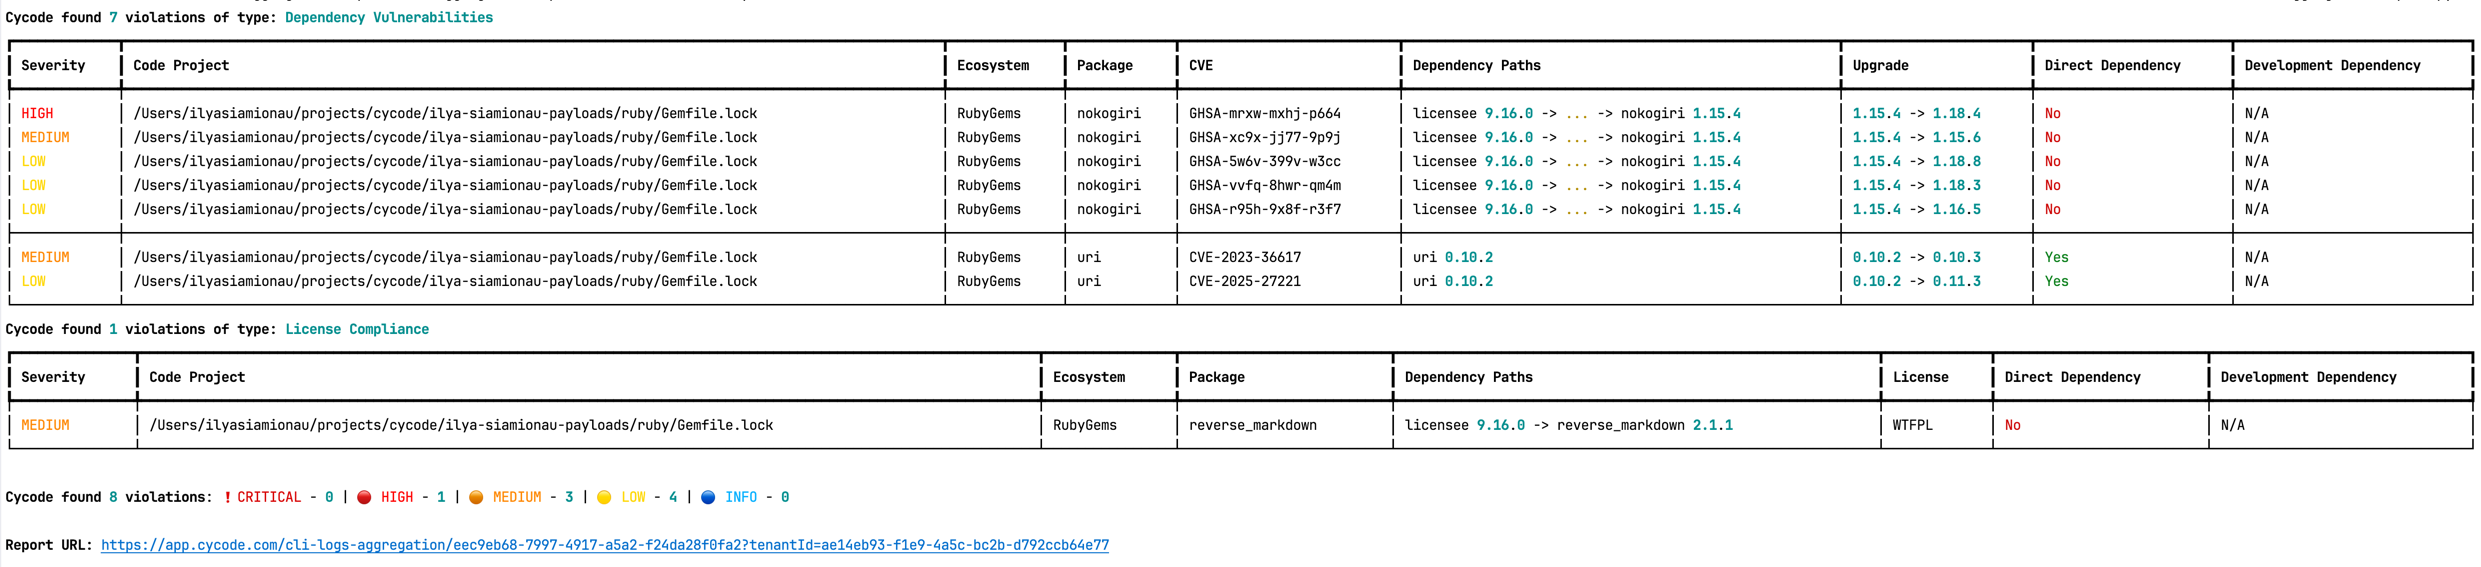
The report page will look something like below:
Package Vulnerabilities Option
[!NOTE] This option is only available to SCA scans.
To scan a specific package vulnerability of your local repository, add the argument --sca-scan package-vulnerabilities following the -t sca or --scan-type sca option.
In the previous example, if you wanted to only run an SCA scan on package vulnerabilities, you could execute the following:
cycode scan -t sca --sca-scan package-vulnerabilities repository ~/home/git/codebase
License Compliance Option
[!NOTE] This option is only available to SCA scans.
To scan a specific branch of your local repository, add the argument --sca-scan license-compliance followed by the name of the branch you wish to scan.
In the previous example, if you wanted to only scan a branch named dev, you could execute the following:
cycode scan -t sca --sca-scan license-compliance repository ~/home/git/codebase -b dev
Lock Restore Option
[!NOTE] This option is only available to SCA scans.
When running an SCA scan, Cycode CLI automatically attempts to restore (generate) a dependency lockfile for each supported manifest file it finds. This allows scanning transitive dependencies, not just the ones listed directly in the manifest. To skip this step and scan only direct dependencies, use the --no-restore flag.
The following ecosystems support automatic lockfile restoration:
| Ecosystem | Manifest file | Lockfile generated | Tool invoked (when lockfile is absent) |
|---|---|---|---|
| npm | package.json | package-lock.json | npm install --package-lock-only --ignore-scripts --no-audit |
| Yarn | package.json | yarn.lock | yarn install --ignore-scripts |
| pnpm | package.json | pnpm-lock.yaml | pnpm install --ignore-scripts |
| Deno | deno.json / deno.jsonc | deno.lock | (read existing lockfile only) |
| Go | go.mod | go.mod.graph | go list -m -json all + go mod graph |
| Maven | pom.xml | bcde.mvndeps | mvn dependency:tree |
| Gradle | build.gradle / build.gradle.kts | gradle-dependencies-generated.txt | gradle dependencies -q --console plain |
| SBT | build.sbt | build.sbt.lock | sbt dependencyLockWrite |
| NuGet | *.csproj | packages.lock.json | dotnet restore --use-lock-file |
| Ruby | Gemfile | Gemfile.lock | bundle --quiet |
| Poetry | pyproject.toml | poetry.lock | poetry lock |
| Pipenv | Pipfile | Pipfile.lock | pipenv lock |
| PHP Composer | composer.json | composer.lock | composer update --no-cache --no-install --no-scripts --ignore-platform-reqs |
If a lockfile already exists alongside the manifest, Cycode reads it directly without running any install command.
SBT prerequisite: The sbt-dependency-lock plugin must be installed. Add the following line to project/plugins.sbt:
addSbtPlugin("software.purpledragon" % "sbt-dependency-lock" % "1.5.1")Stop on Error Option
By default, Cycode continues scanning even if a file cannot be read (e.g. due to a permission error) or a dependency lockfile cannot be generated during an SCA scan. The failed item is skipped with a warning and the scan proceeds with the remaining files.
Use --stop-on-error to change this behaviour: the scan aborts immediately on the first such failure and reports the error.
cycode scan -t sca --stop-on-error path ~/home/git/codebaseThis is useful in CI pipelines where a silent failure would produce an incomplete scan result. When --stop-on-error is triggered you can either fix the underlying issue or, for SCA restore failures specifically, add --no-restore to skip lockfile generation and scan direct dependencies only.
When --stop-on-error is used, the CLI distinguishes between scan errors and policy violations via exit codes:
| Exit code | Meaning |
|---|---|
0 | Scan completed with no violations |
1 | Scan completed and violations were found |
2 | Scan aborted due to an error (only when --stop-on-error is set) |
Repository Scan
A repository scan examines an entire local repository for any exposed secrets or insecure misconfigurations. This more holistic scan type looks at everything: the current state of your repository and its commit history. It will look not only for secrets that are currently exposed within the repository but previously deleted secrets as well.
To execute a full repository scan, execute the following:
cycode scan repository {{path}}
For example, if you wanted to scan a repository stored in ~/home/git/codebase, you could execute the following:
cycode scan repository ~/home/git/codebase
The following option is available for use with this command:
| Option | Description |
|---|---|
-b, --branch TEXT | Branch to scan, if not set scanning the default branch |
Branch Option
To scan a specific branch of your local repository, add the argument -b (alternatively, --branch) followed by the name of the branch you wish to scan.
Given the previous example, if you wanted to only scan a branch named dev, you could execute the following:
cycode scan repository ~/home/git/codebase -b dev
Path Scan
A path scan examines a specific local directory and all the contents within it, instead of focusing solely on a GIT repository.
To execute a directory scan, execute the following:
cycode scan path {{path}}
For example, consider a scenario in which you want to scan the directory located at ~/home/git/codebase. You could then execute the following:
cycode scan path ~/home/git/codebase
Terraform Plan Scan
Cycode CLI supports Terraform plan scanning (supporting Terraform 0.12 and later)
Terraform plan file must be in JSON format (having .json extension)
If you just have a configuration file, you can generate a plan by doing the following:
-
Initialize a working directory that contains Terraform configuration file:
terraform init -
Create Terraform execution plan and save the binary output:
terraform plan -out={tfplan_output} -
Convert the binary output file into readable JSON:
terraform show -json {tfplan_output} > {tfplan}.json -
Scan your
{tfplan}.jsonwith Cycode CLI:cycode scan -t iac path ~/PATH/TO/YOUR/{tfplan}.json
Commit History Scan
[!NOTE] Commit History Scan is not available for IaC scans.
The commit history scan command provides two main capabilities:
- Full History Scanning: Analyze all commits in the repository history
- Diff Scanning: Scan only the changes between specific commits
Secrets scanning can analyze all commits in the repository history because secrets introduced and later removed can still be leaked or exposed. For SCA and SAST scans, the commit history command focuses on scanning the differences/changes between commits, making it perfect for pull request reviews and incremental scanning.
A commit history scan examines your Git repository's commit history and can be used both for comprehensive historical analysis and targeted diff scanning of specific changes.
To execute a commit history scan, execute the following:
cycode scan commit-history {{path}}
For example, consider a scenario in which you want to scan the commit history for a repository stored in ~/home/git/codebase. You could then execute the following:
cycode scan commit-history ~/home/git/codebase
The following options are available for use with this command:
| Option | Description |
|---|---|
-r, --commit-range TEXT | Scan a commit range in this git repository, by default cycode scans all commit history (example: HEAD~1) |
Commit Range Option (Diff Scanning)
The commit range option enables diff scanning – scanning only the changes between specific commits instead of the entire repository history. This is particularly useful for:
- Pull request validation: Scan only the changes introduced in a PR
- Incremental CI/CD scanning: Focus on recent changes rather than the entire codebase
- Feature branch review: Compare changes against main/master branch
- Performance optimization: Faster scans by limiting scope to relevant changes
Commit Range Syntax
The --commit-range (-r) option supports standard Git revision syntax:
| Syntax | Description | Example |
|---|---|---|
commit1..commit2 | Changes from commit1 to commit2 | abc123..def456 |
commit1...commit2 | Changes in commit2 not in commit1 | main...feature-branch |
commit | Changes from commit to HEAD | HEAD~1 |
branch1..branch2 | Changes from branch1 to branch2 | main..feature-branch |
Diff Scanning Examples
Scan changes in the last commit:
cycode scan commit-history -r HEAD~1 ~/home/git/codebaseScan changes between two specific commits:
cycode scan commit-history -r abc123..def456 ~/home/git/codebaseScan changes in your feature branch compared to main:
cycode scan commit-history -r main..HEAD ~/home/git/codebaseScan changes between main and a feature branch:
cycode scan commit-history -r main..feature-branch ~/home/git/codebaseScan all changes in the last 3 commits:
cycode scan commit-history -r HEAD~3..HEAD ~/home/git/codebase[!TIP] For CI/CD pipelines, you can use environment variables like
${{ github.event.pull_request.base.sha }}..${{ github.sha }}(GitHub Actions) or$CI_MERGE_REQUEST_TARGET_BRANCH_SHA..$CI_COMMIT_SHA(GitLab CI) to scan only PR/MR changes.
Pre-Commit Scan
A pre-commit scan automatically identifies any issues before you commit changes to your repository. There is no need to manually execute this scan; configure the pre-commit hook as detailed under the Installation section of this guide.
After installing the pre-commit hook, you may occasionally wish to skip scanning during a specific commit. To do this, add the following to your git command to skip scanning for a single commit:
SKIP=cycode git commit -m <your commit message>`Pre-Push Scan
A pre-push scan automatically identifies any issues before you push changes to the remote repository. This hook runs on the client side and scans only the commits that are about to be pushed, making it efficient for catching issues before they reach the remote repository.
[!NOTE] Pre-push hook is not available for IaC scans.
The pre-push hook integrates with the pre-commit framework and can be configured to run before any git push operation.
Installing Pre-Push Hook
To set up the pre-push hook using the pre-commit framework:
-
Install the pre-commit framework (if not already installed):
pip3 install pre-commit -
Create or update your
.pre-commit-config.yamlfile to include the pre-push hooks:repos: - repo: https://github.com/cycodehq/cycode-cli rev: v3.5.0 hooks: - id: cycode-pre-push stages: [pre-push] -
For multiple scan types, use this configuration:
repos: - repo: https://github.com/cycodehq/cycode-cli rev: v3.5.0 hooks: - id: cycode-pre-push # Secrets scan stages: [pre-push] - id: cycode-sca-pre-push # SCA scan stages: [pre-push] - id: cycode-sast-pre-push # SAST scan stages: [pre-push] -
Install the pre-push hook:
pre-commit install --hook-type pre-pushA successful installation will result in the message:
Pre-push installed at .git/hooks/pre-push. -
Keep the pre-push hook up to date:
pre-commit autoupdate
How Pre-Push Scanning Works
The pre-push hook:
- Receives information about what commits are being pushed
- Calculates the appropriate commit range to scan
- For new branches: scans all commits from the merge base with the default branch
- For existing branches: scans only the new commits since the last push
- Runs the same comprehensive scanning as other Cycode scan modes
Smart Default Branch Detection
The pre-push hook intelligently detects the default branch for merge base calculation using this priority order:
- Environment Variable:
CYCODE_DEFAULT_BRANCH- allows manual override - Git Remote HEAD: Uses
git symbolic-ref refs/remotes/origin/HEADto detect the actual remote default branch - Git Remote Info: Falls back to
git remote show originif symbolic-ref fails - Hardcoded Fallbacks: Uses common default branch names (origin/main, origin/master, main, master)
Setting a Custom Default Branch:
export CYCODE_DEFAULT_BRANCH=origin/developThis smart detection ensures the pre-push hook works correctly regardless of whether your repository uses main, master, develop, or any other default branch name.
Skipping Pre-Push Scans
To skip the pre-push scan for a specific push operation, use:
SKIP=cycode-pre-push git pushOr to skip all pre-push hooks:
git push --no-verify[!TIP] The pre-push hook is triggered on
git pushcommand and scans only the commits that are about to be pushed, making it more efficient than scanning the entire repository.
Platform Notes & Limitations
- Read-only today. Only
GETendpoints are exposed in this beta. - Spec-driven. Adding a new endpoint to the API surfaces it automatically the next time the cache is refreshed.
- No bundled spec. The first
cycode platforminvocation after install (or after the 24h cache expires) performs a network fetch. On slow connections this first call may take a few seconds; subsequent calls are near-instant until the cache expires. - Override the cache TTL with
CYCODE_SPEC_CACHE_TTL=<seconds>.